


Are you tired of guessing if your meat is cooked just right? Using a dial meat thermometer can take the guesswork out of cooking and help you serve juicy, perfectly cooked meals every time.
But if you’re not sure how to read one, it can feel confusing and frustrating. Don’t worry—this guide will walk you through the simple steps to understand your dial meat thermometer. By the end, you’ll feel confident knowing exactly when your meat is safe to eat and deliciously done.
Keep reading, and say goodbye to undercooked or overcooked meat for good!
Choosing The Right Dial Meat Thermometer
Choosing the right dial meat thermometer is key to cooking meat safely and well. It helps check if the meat reaches the perfect temperature. This prevents undercooking or overcooking.
Many dial thermometers exist. Each has unique features and uses. Knowing the types and what to look for makes your choice easier.
Types Of Dial Thermometers
Dial thermometers come in several types. The most common is the instant-read dial. It shows the temperature quickly.
Another type is the oven-safe dial thermometer. You can leave it in the meat while cooking. It measures temperature without opening the oven.
Some dial thermometers have a probe attached with a cord. This allows you to check the meat temperature from outside the oven or grill.
Features To Look For
Choose a thermometer with a clear, easy-to-read dial. Large numbers help you see the temperature fast.
Look for a thermometer with a temperature range that fits your cooking needs. Most should read from 100°F to 220°F.
A fast response time helps. It shows the temperature quickly, saving time and effort.
Durability matters too. Pick a thermometer made from strong materials like stainless steel.
Consider a thermometer with a clip or magnet. It can attach to pots or ovens for easy use.
Preparing The Thermometer For Use
Preparing your dial meat thermometer is an important first step. It ensures accurate temperature readings for safe cooking. Taking a few minutes to set up your thermometer helps avoid mistakes. Proper preparation means you trust the results when cooking meat.
Calibrating Your Thermometer
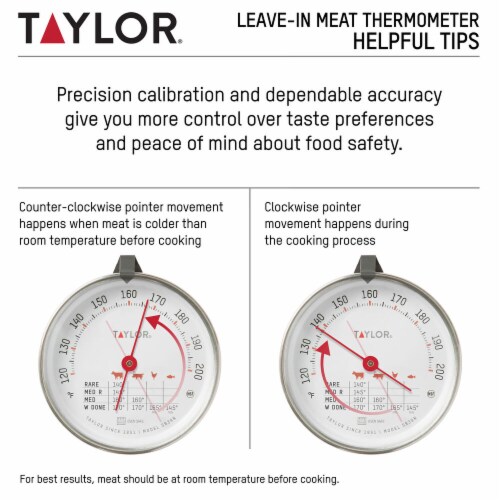
Calibration makes sure your thermometer shows the correct temperature. Start by filling a glass with ice and water. Stir the ice water well and let it sit for a minute. Insert the thermometer’s probe into the ice water. Avoid touching the glass sides or bottom.
The thermometer should read 32°F (0°C). If it does not, adjust the dial carefully. Turn the calibration nut or screw until the needle points to 32°F. This step improves accuracy before use.
Cleaning Before Cooking
Clean your thermometer before every use to avoid cross-contamination. Use warm, soapy water and a soft cloth. Wipe the probe thoroughly to remove any dirt or grease. Rinse with clean water and dry it well.
Never soak the entire thermometer in water. Only clean the metal probe. Keeping the thermometer clean helps keep your food safe and tasty.
Inserting The Thermometer Properly
Inserting a dial meat thermometer correctly is key to checking if your meat is cooked safely. Proper placement helps you get the right temperature. This avoids undercooked or overcooked meals. Follow simple steps for best results.
Best Placement In Meat
Insert the thermometer into the thickest part of the meat. Avoid bones, fat, or gristle as they give false readings. For whole chicken or turkey, place the probe into the inner thigh. For steaks or chops, go into the center. Make sure the tip reaches the middle of the meat.
Hold the thermometer steady and wait for the needle to stop moving. This shows the true temperature. Remove the thermometer carefully and clean it before checking another piece.
Avoiding Common Mistakes
Do not touch the thermometer to bone or fat. This leads to wrong temperature readings. Avoid inserting the thermometer too shallow or too deep. It must be in the thickest area to get an accurate check.
Do not leave the thermometer in while cooking, unless it is designed for that. Check the temperature quickly to prevent heat loss. Clean the probe after every use to stop bacteria spread.
Reading The Temperature Accurately
Reading the temperature accurately is key to cooking meat safely and perfectly. A dial meat thermometer shows the temperature inside the meat. Understanding the dial helps avoid undercooking or overcooking. It also keeps food safe to eat.
Focus on the dial and watch the needle carefully. The needle points to the current temperature. Knowing how to read this right saves time and improves your cooking.
Interpreting The Dial Scale
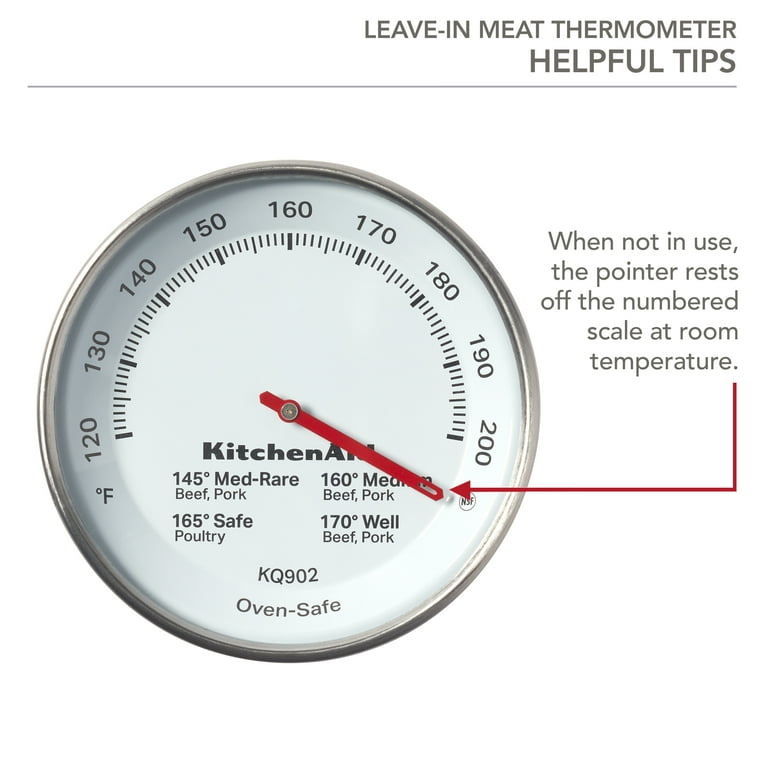
The dial scale is marked in degrees. Most dials show Fahrenheit or Celsius. Find which one your thermometer uses. The needle moves as the meat heats up. It stops at the meat’s internal temperature. Read the number where the needle points exactly.
Some dials have color zones. These colors guide safe and unsafe temperature ranges. Pay attention to these colors for quick checks. Make sure the needle is steady before reading.
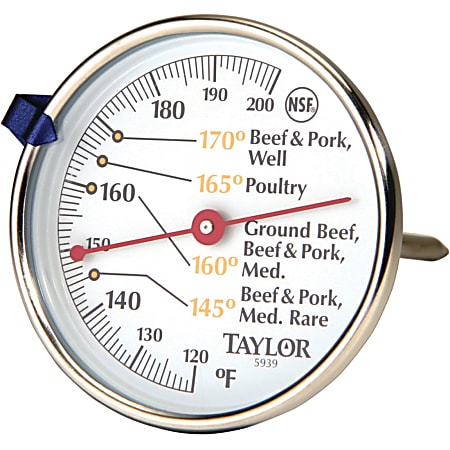
Recognizing Safe Cooking Temperatures
Different meats need different safe temperatures. Poultry should reach 165°F (74°C). Ground meats need 160°F (71°C). Steaks and roasts are safe at 145°F (63°C). Use these temperatures as your goal.
Check the temperature in the thickest part of the meat. Avoid bones or fat for accurate reading. Rest the meat after cooking for a few minutes. The temperature can rise slightly while resting.
Tips For Consistent Results
Getting accurate readings from your dial meat thermometer is key to cooking meat safely and perfectly. Small mistakes can cause wrong temperatures and overcooked or undercooked meat. Use these tips for consistent results every time you check your meat.
Checking Multiple Spots
Insert the thermometer into different parts of the meat. Thick cuts can have uneven heat. Check near the center and edges for safety. This helps find the coldest point. Always avoid bones or fat, which give false readings.
Allowing Time For Stable Readings
Wait for the dial needle to stop moving before reading. This usually takes 15 to 20 seconds. Moving the thermometer too soon shows wrong temperatures. Hold it steady inside the meat to get a true reading.
Maintaining Your Dial Meat Thermometer
Maintaining your dial meat thermometer helps it stay accurate and last longer. Proper care is simple and takes little time. Follow easy steps to keep your tool clean and safe for every use.
Cleaning After Use
Clean the probe right after you finish cooking. Wipe it with warm, soapy water. Avoid soaking the whole thermometer in water. Use a soft cloth or sponge to remove food bits. Rinse the probe well and dry it with a clean towel. This prevents bacteria and keeps the thermometer ready for next use.
Storing Properly
Store your dial meat thermometer in a dry place. Keep it away from heat or direct sunlight. Use a protective case or wrap it in a soft cloth. Avoid tossing it into a drawer with heavy items. Proper storage stops damage and keeps the dial clear and readable.
Frequently Asked Questions
How Do I Read The Temperature On A Dial Meat Thermometer?
To read a dial meat thermometer, insert the probe into the thickest part of the meat. Wait for the needle to stop moving. The number it points to is the internal temperature in Fahrenheit.
Where Should I Place The Dial Thermometer In Meat?
Insert the dial thermometer into the thickest, center part of the meat. Avoid touching bone, fat, or gristle for an accurate reading. This ensures you measure the true internal temperature.
How Long Does It Take For A Dial Thermometer To Read?
A dial thermometer usually takes 15 to 20 seconds to stabilize. Hold it steady in the meat until the needle stops moving to get the correct temperature.
Can I Calibrate My Dial Meat Thermometer?
Yes, you can calibrate it using ice water or boiling water tests. Adjust the dial screw to match 32°F for ice water or 212°F for boiling water for accuracy.
Conclusion
Reading a dial meat thermometer is simple and useful. Insert the probe into the thickest part of the meat. Wait a few seconds for the needle to stop moving. The number the needle points to shows the temperature. This helps you cook meat safely and avoid undercooking.
Practice a few times to feel confident using it. Enjoy tasty meals with perfect cooking every time. Keep your family safe by knowing the right temperature. Easy, right? Just follow these steps and cook with confidence.
