


Is your refrigerator working harder than usual? Dirty coils could be the hidden reason behind higher energy bills and poor cooling.
Cleaning your refrigerator coils is easier than you think, and it can save you money while extending the life of your appliance. You’ll discover simple, step-by-step tips to get those coils spotless and keep your fridge running smoothly. Ready to boost your fridge’s performance and cut down on costs?
Let’s dive in!

Why Clean Refrigerator Coils
Cleaning refrigerator coils is a simple task that helps your fridge work better. Dust and dirt build up on coils over time. This makes the fridge work harder to keep food cold. Regular cleaning keeps the appliance running smoothly and saves money.
Impact On Cooling Efficiency
Dirty coils reduce the fridge’s ability to cool well. Dust blocks heat from leaving the coils. The compressor must run longer to cool the fridge. Clean coils allow heat to escape easily. This helps the fridge keep food fresh.
Energy Savings
When coils are clean, the fridge uses less electricity. A hard-working compressor draws more power. Cleaning coils lowers energy use and cuts bills. Saving energy also helps the environment.
Extending Appliance Lifespan
Cleaning coils reduces stress on fridge parts. The compressor and motor last longer with less work. This means fewer repairs and a longer fridge life. Keeping coils clean protects your investment.
Tools Needed For Cleaning
Cleaning refrigerator coils is simple with the right tools. These tools help remove dust and dirt effectively. Using proper tools saves time and keeps your fridge running well.
Brushes And Vacuum
A soft brush helps loosen dust on coils gently. A vacuum cleaner with a narrow nozzle picks up dirt easily. These tools work best together for thorough cleaning. They prevent damage to the coils while removing debris.
Protective Gear
Wear gloves to protect your hands from sharp edges. Use a mask to avoid breathing in dust and dirt. Safety glasses keep your eyes safe from dust particles. Protective gear makes cleaning safer and more comfortable.
Cleaning Solutions
Use mild soap mixed with water for cleaning sticky dirt. Avoid harsh chemicals that can damage coils. A spray bottle helps apply the solution evenly. Clean coils improve fridge efficiency and save energy.
Preparing The Refrigerator
Before cleaning refrigerator coils, prepare the appliance carefully. This step ensures safety and makes cleaning easier. Take time to get everything ready.
Unplugging The Appliance
Always unplug the refrigerator first. This stops electricity flow and prevents shocks. Find the power cord at the back or side. Pull it out from the socket gently.
Never clean the coils while the fridge is plugged in. Safety comes first to avoid accidents.
Moving The Refrigerator
Next, move the fridge away from the wall. This gives you space to reach the coils. Be careful not to damage the floor or fridge. Ask for help if the fridge is heavy.
Pull it out slowly and steadily. Avoid sudden movements to prevent injuries.
Clearing The Area
Clear the area around the refrigerator. Remove rugs, chairs, or anything blocking access. This creates a safe workspace for cleaning.
Keep children and pets away during this process. A tidy space helps you focus on cleaning well.
Cleaning Steps
Cleaning refrigerator coils helps your fridge run better and last longer. Dust and dirt block airflow and make the fridge work harder. Follow these simple cleaning steps to keep coils clear and efficient.
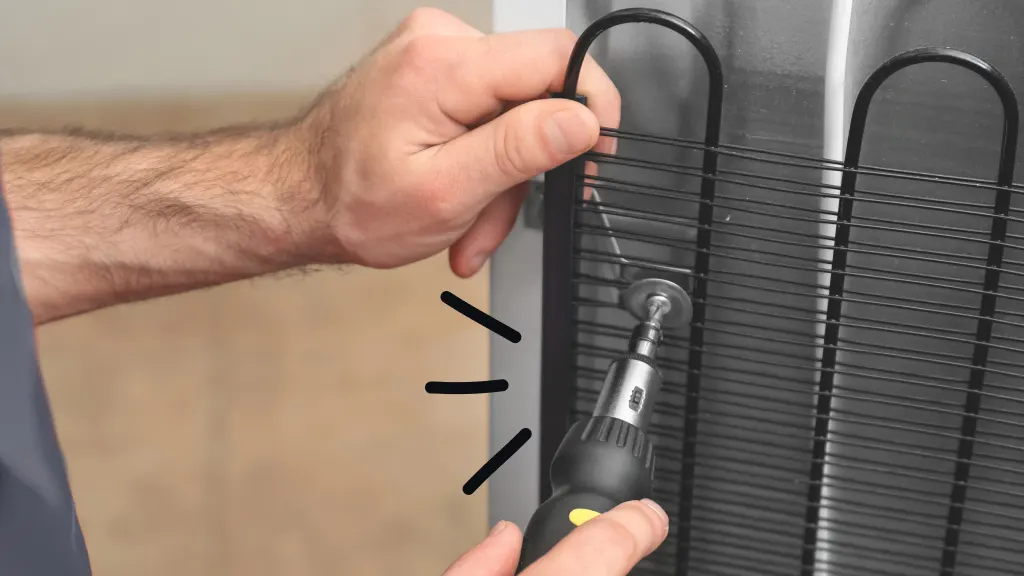
Accessing The Coils
First, unplug the refrigerator for safety. Locate the coils, usually at the back or under the fridge. Some models have a panel covering the coils. Remove the panel carefully using a screwdriver if needed. Make sure you can see and reach the coils well.
Removing Dust And Debris
Use a vacuum cleaner with a brush attachment to remove loose dust. Gently vacuum the coils and the surrounding area. Avoid pressing too hard to prevent damage. A soft brush can help sweep away stubborn dirt. Clear out dust from vents and fan blades too.
Deep Cleaning Techniques
For a thorough clean, mix warm water with mild soap. Dip a cloth or sponge into the solution and wring it out. Wipe down the coils carefully without soaking them. Use a dry cloth to remove any moisture. Let the coils dry fully before plugging the fridge back in.
Post-cleaning Tips
Cleaning refrigerator coils improves your fridge’s efficiency and lifespan. After cleaning, take a few simple steps to ensure everything works well. These post-cleaning tips help keep your fridge in top shape.
Repositioning The Refrigerator
Move the fridge back gently to avoid damage. Leave some space behind for airflow. Good airflow helps the coils stay cool and work better. Avoid pushing the fridge too close to the wall.
Plugging Back In
Check the power cord for any damage before plugging it in. Insert the plug firmly into the socket. Turn the fridge on and listen for normal sounds. If it sounds unusual, turn it off and check again.
Regular Maintenance Schedule
Set a reminder to clean coils every six months. Regular cleaning stops dust buildup and keeps the fridge efficient. Wipe the area around coils to prevent dirt. Simple habits save energy and repair costs later.

Troubleshooting Common Issues
Cleaning refrigerator coils can sometimes be tricky. Some problems make the task harder and may need extra care. Knowing how to fix these common issues can save time and keep your fridge running well.
Coils Hard To Reach
Many refrigerators have coils in tough spots. They might be at the back or under the fridge. Use a coil cleaning brush with a long handle to reach tight places. Moving the fridge carefully helps access coils easier. Always unplug the fridge before cleaning to stay safe.
Persistent Dirt
Sometimes, dirt sticks firmly to the coils. Dust and grease can build up over months. Use a vacuum cleaner with a brush attachment to loosen dirt. For stubborn grime, a soft cloth dampened with mild soap works well. Avoid using sharp tools that could damage coils.
Signs Of Coil Damage
Look for bent fins or broken coils. Damage can reduce cooling efficiency and raise energy use. If fins are bent, gently straighten them with a fin comb or a small flat tool. Severe damage may need a professional repair. Regular checks help spot problems early.
Frequently Asked Questions
How Often Should I Clean Refrigerator Coils?
Clean refrigerator coils every 6 months to maintain efficiency. Dust and dirt reduce cooling performance and increase energy use. Regular cleaning extends your fridge’s lifespan and lowers electricity bills. Check coils more often if you have pets or dusty environments for optimal results.
What Tools Do I Need To Clean Coils?
Use a coil cleaning brush, vacuum cleaner, and a soft cloth. The brush removes dirt from coil fins gently. Vacuum sucks up loosened dust and debris. A cloth helps wipe any remaining grime. Avoid harsh tools to prevent damaging the coils.
Can I Clean Refrigerator Coils Myself Safely?
Yes, cleaning coils is safe if you unplug the fridge first. Use gentle tools and avoid bending coil fins. Work in a well-lit area and follow manufacturer guidelines. If unsure, consider professional help to prevent damage or injury.
What Are Signs Of Dirty Refrigerator Coils?
Signs include warm fridge interior, increased noise, and higher energy bills. The fridge may run continuously without cooling well. Dusty or greasy coils visibly indicate a need for cleaning. Timely coil cleaning prevents costly repairs and food spoilage.
Conclusion
Cleaning refrigerator coils keeps your fridge running well. It saves energy and lowers electricity bills. Dust and dirt can slow your fridge down. Regular cleaning stops this problem early. You only need a few tools and some time. Make it part of your home routine.
Your fridge will last longer and stay cool. Simple steps make a big difference. Keep your coils clean for a healthy fridge. Easy care leads to better food storage. Small actions help your fridge work smarter.
